Search blog

Friday, December 29, 2017

[SOLVED] - Screen Brightness Resetting To Maximum Value After Every System Restart/Boot

You could try adding a line to /etc/rc.local that will set the desired brightness level. To edit the file, run

 sudo -H gedit /etc/rc.local  
and add the following

 echo X > /sys/class/backlight/intel_backlight/brightness  
so that the end result looks like this

 #!/bin/sh -e  
 #  
 # rc.local  
 #  
 # This script is executed at the end of each multiuser runlevel.  
 # Make sure that the script will "exit 0" on success or any other  
 # value on error.  
 #  
 # In order to enable or disable this script just change the execution  
 # bits.  
 #  
 # By default this script does nothing.  
 echo X > /sys/class/backlight/intel_backlight/brightness  
 exit 0  
Substitute X by the desired brightness level.

PS: Alternatively, there may be /sys/class/backlight/acpi_video0/brightness instead of the above. Brightness levels vary wildly, and may range from 0 to 10 or to 1000. To find the maximum value, try

 cat /sys/class/backlight/acpi_video0/max_brightness  
or
 cat /sys/class/backlight/intel_backlight/max_brightness  

Source: https://askubuntu.com/questions/151651/brightness-is-reset-to-maximum-on-every-restart

Tuesday, December 12, 2017

isset() Vs empty() in PHP

A Very Nice Video Tutorial Explaining isset() Vs empty() in PHP:


Sunday, November 26, 2017

[Explained] - Multistore/Multisite Key Points & Concepts in Magento 1x/2x

>> Inventory

It is global across all the websites and stores. Either the product is IN STOCK or Not! If you need different inventories, you will have to use third party modules.

>> Fundamental Concept

A single installation of Magento can have multiple stores that share the same Admin. Multiple stores can share the same domain, be set up as subdomains of the same domain, or have entirely different domains. Stores that have the same IP address and domain, use the same security certificate, and share a single checkout process. If you want each store to have a dedicated checkout process under its own domain, each store must have a distinct IP address with a separate security certificate. Here are some examples of how URLs can be configured for multiple stores:
  • yourdomain.com/store1 - Each store has a different path, but shares the same domain.
  • yourdomain.com/store
  • store1.yourdomain.com - Each store has a different subdomain of the primary domain.
  • store2.yourdomain.com
  • store1.com - Each store has a dedicated domain.
  • store2.com
The important thing to understand is that the stores uses the same Magento code, shares the same Admin, and catalog. They can, however, have different identities, product selections, and themes.

The multi-store feature is one of the most important and powerful feature of Magento. (Multi store is also known as multi site.) It allows growing businesses to manage multiple websites and stores through one Magento installation under a single admin panel.

The primary purpose behind the Magento Store layer is the ability to sell various different products, structured within different categories to the same user base with the same checkout parameters.

Because the Magento Store Layer requires that you create a new Magento Store View you will have all of the functionality of the aforementioned, plus some additional functionality.

Magento uses the terminology of GWS (Global, Website, Store) to explain the ability to create multiple websites and stores through one installation. There is one more part called Store View that is added to each Magento installation automatically.

The three components of GWS are explained below:
  • Global refers to the complete installation of Magento
  • Website is the domain you are utilizing. Each domain or website can have multiple stores, while you can also have multiple domains on a single installation
  • Stores are your actual product catalogue. Multiple stores can be created on a single domain or more than one domains
  • Store View – Mainly for language or separate design on store-2-store basis
And while we are at it, I think it would be wise to explain the Store Views term too. Store Views can be defined as the multiple presentation of your front-end data. Most e-Commerce stores use this feature to have stores in multiple languages.

[Explained] - Multistore/Multisite Key Points & Concepts in Magento 1x/2x
Click on image to enlarge

The only use of Magento Store View is for multi- language or different theme design. You will typically have one Store View per language.

>> Magento Multi Store


>>> Features that CANNOT be implemented in a multi-store:
  • Payment Method: You will not be able to have specific payment methods for each Store
  • Shipping Method: You will not be able to have separate shipping methods for each Store
  • Products:
    • You cannot change the tax structures within Stores
    • You cannot manage a separate inventory with Stores
  • Configuration Settings: You will not be able to manage ANY configuration settings between Stores
>>> Features that CAN be implemented in a multi-store:
  • Products: You will be able to manage a completely different catalog between Store
  • Categories: You will be able to manage a completely different category structure for each Store
Stores are ‘children’ of websites. They are your actual product catalog. Products and Categories are managed on the store level. A root category is configured for each store. They are your actual product catalog. Products and Categories are managed on the store level.

>> Multiple Magento Websites

The primary purpose behind the Magento Website layer is the ability to change every aspect of the customer experience, including the ability to manage a completely different set of customers for each Website.

In mutli-website — From one administration you can manage a few shops.

There’s essentially nothing that you cannot do with multiple Magento Websites. From the reporting and orders to the customer base and checkout configurations, you can manage everything with different parameters. Basically Multiple Magento Website is just like Multi-site in Drupal.

>> When to use Magento Multiple Website?


If you want to sell your products in several stores and have to change one of the following criteria in these shops, then you have to go for different websites:
  • different price
  • different tax classes
  • different (base) currencies
  • different payment options
  • different shipping options
>> If you just create store groups, your customers will be able to log in to all shops with the same credentials whether you like it or not.

>> If you create websites, it's up to you whether your customers can log in to all shops with the same credentials.

>>  Conceptual Example

Imagine that you sell electronics, software and DVDs. For that you want to create 3 websites. You would like them on separate subdomains, so we have companyname.com/electornics, companyname.com/software and companyname.com/dvds.

In companyname.com/electornics store you would like to sell mobile devices and computers, thus you create 2 separate stores for them - Mobiles and Computers. Each of them has lots of categories and subcategories, so it makes sense to create separate category tree with own root category for each. From one website your clients can switch between the stores.

Additionally, Mobile phones you you need to be available in English and Spanish and Computers in English, Spanish and French. Thus, for ‘Mobiles’ you create 2 store views and for ‘Computers’ 3 Magento store views.

The following scheme illustrates the mentioned above:

Click on image to enlarge
 

WARNING!!!

When using Store Code in URLs, in some cases system may not work properly if URLs without Store Codes are specified in the third party services (e.g. PayPal etc.). – Setting s can be found at: Store >> Config >> General >> Web

Source: http://devdocs.magento.com/guides/v2.0/config-guide/multi-site/ms_websites.html

Wednesday, November 15, 2017

How to Find/Edit Location/Path of php.ini File in your Ubuntu/LAMP Setup

In some cases, you might have two PHP configuration files: one for the PHP command line and for the web server. If so, make the change in both php.ini files.

1. To Edit web server's php.ini file


Open any text editor of you choice like Gedit and Copy/Paste the following PHP code and Save the file as 'info.php' inside the Document Root folder of your Web Server. Usually the path to your Document Root should be something like '/var/www/html/'. Make sure to save your file under the 'html' folder.

 <?php   
 phpinfo();   
 ?>  

Now access this file from a browser using the following URL: http://localhost/info.php

You should be seeing a page open as shown in the image below. The path to your 'php.ini' file will be under Loaded Configuration File. In my case the path was as follows: Loaded Configuration File    /etc/php/5.6/apache2/php.ini

How to Find/Edit Location/Path of php.ini File in your Ubuntu/LAMP Setup
Click on image to enlarge


2. To Edit CLI's 'php.ini' file


Open your Terminal (CTRL+ALT+T) and enter the following command:
 php --ini  

You should get output as shown in the image below. Here too you should be looking for the Loaded Configuration File path. In my case it was /etc/php/5.6/cli/php.ini.

Edit CLI's 'php.ini' file
Click on image to enlarge

Sunday, November 12, 2017

Type Juggling and Type Casting in PHP

Type juggling and type casting can be used to change a value's type. While programming, it's important to know the type of the value and use type casting or juggling to convert it to compatible types.

Type Juggling:

When PHP converts a value from one type of value to another, it is called type juggling. PHP does not require (or support) explicit type definition in variable declaration; a variable's type is determined by the context in which the variable is used. That is to say, if a string value is assigned to variable $var, $var becomes a string. If an integer value is then assigned to $var, it becomes an integer.

 <?php  
 $foo = "0"; // $foo is string (ASCII 48)  
 $foo += 2; // $foo is now an integer (2)  
 $foo = $foo + 1.3; // $foo is now a float (3.3)  
 ?>  

Type Casting:

When you explicitly set a type to change the value into another type, it is called type casting. PHP is a loosely typed language and assigns types to variables depending what is assigned to it. Variables coming from get/post and cookies etc are generally cast as strings rather than other types and there are often other times when you need to specifically cast a type in PHP as e.g. an integer.

An example of this in action is as follows, where $foo starts off as a string value and is then cast into an integer:

 $foo = '1';  
 echo gettype($foo); // outputs 'string'  
 settype($foo, 'integer');  
 echo gettype($foo); // outputs 'integer'   

Tuesday, November 7, 2017

Restarting Pulse Audio from Terminal

For whatever reason(s), you would like to restart Pulse Audio, the following are the steps that will help you just do that:

In a standard setup running pulseaudio -k restarts the daemon. Nothing else to do.

In case Pulse Audio is not running typing pulseaudio without further options will start the daemon using defaults in /etc/pulse/daemon.conf and /etc/pulse/default.pa.

User-defined settings in 'home/.pulse/ ' or 'home/.config/pulse/' will override system-wide settings.

NOTE: In case of issues it will often help to DELETE these directories before restarting pulseaudio. You can only delete files that were generated at the present date.

For details see PulseAudio Wiki.

Finally to restart PA from your terminal:

 sudo service pulseaudio restart  

If the restart command doesn't work, you can try starting PulseAudio by entering the following command in your terminal:
 pulseaudio  
or

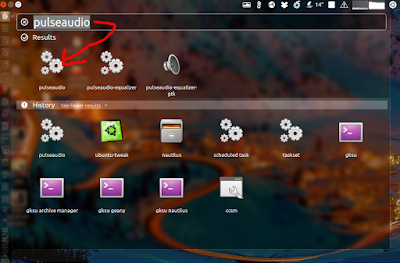
You can also run PulseAudio from the Run Command Prompt in Gnome Shell. First press Alt+F2, and then enter pulseaudio, and finally select pulseaudio as shown in the image below.

Restarting Pulse Audio from Terminal
Click on image to enlarge
Reference: How can I restart pulseaudio without logout?

Suspend Your Ubuntu System From The Terminal

If you would like to suspend your Ubuntu system from the terminal, then use the following command:

 sudo pm-suspend  

Sunday, October 22, 2017

Empty/Delete Trash in Ubuntu Using Command Line/Terminal

If you would like to empty your Ubuntu Trash using command line here's how to do it. Open your terminal (CTRL+ALt+T) and enter the command below:

 rm -rf ~/.local/share/Trash/*  

Tuesday, October 10, 2017

[SOLVED] - Allow Other Users to Access Your Localhost Website In Your LAN

Follow the instructions below, if you would like to allow access to your localhost website amongst your peers in the same Local Area Network:

1. First, you may create a Virtual Host for your local website. To learn how to create virtual host in your localhost, you can go through my following tutorials. If you make use of virtual host then you can use local domain name such as http://wordpress.local or http://drupal.local etc. If you do not make use of localhost then
If you aren't using Virtual Host then you will have to use something like http://192.168.1.1:80/path-to-website. Here:
  • 192.168.1.1 is your local ip. Visit this link to find your local ip: https://goo.gl/NT31td
  • 80 is the port number, which is the port number for http, the port that is used to access your website locally and remotely
 2. Once you have created your Virtual Host then your peers will need to update their host file by adding the lines below:

 127.0.0.1     example.local  

where,
  •  127.0.0.1 needs to be replaced with your local ip
  • example.local needs to be replaced with the virtual host you created for your website
To update your host file check the respective link below :

Check Active Port & Port Numbers In Your Localhost-Ubuntu System

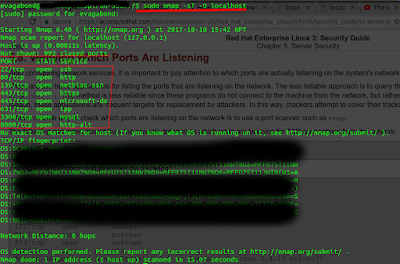
If you would like to know the active/open ports, or in networking terms, which ports are listening and their port numbers in your Ubuntu system, open your terminal and enter the following command:

 sudo nmap -sT -O localhost  

Then you should get output as shown in the image below:

Check Active Port & Port Numbers In Your Localhost-Ubuntu System
Click on image to enlarge

For further reading, you may visit the following page: Verifying Which Ports Are Listening

Monday, October 9, 2017

What is Port Fowarding?

While working on WD My Cloud and trying to set up its Cloud Service I had to configure Port Forwarding to enable its Cloud Access service. Unless Port Forwarding was configured, using it's Cloud Service didn't seem to be possible. And that's when I had to research on Port Forwarding. Without setting up Port Forwarding, the connection status displayed at WD's Admin Dashboard was as follows:
"Connected: Relay connection established"

Although, while at college I'd to study subjects such as Data Communication & Computer Networking, where topics such as Port Forwarding etc are covered; since my work doesn't involve Computer Networks I seem to have forgotten the concept.

Anyway here are some wonderful explanation I found related to Port Forwarding.

1. What is Port Forwarding?
Ans:  In simple concept, Port is not a physical connection but its a logical connection that is used by programs and services to exchange information.

Explanation 1:


Explanation 2:


Thursday, September 28, 2017

Enable both Visual & HTML Editor for Admin, Editor & Author but Only Visual Editor for Subscriber in bbPress

Use the code below to enable both Visual & HTML Editor for roles such as Admin, Editor & Author but Only Visual Editor for Subscriber in your bbPress installation:

 function bbp_enable_visual_editor( $args = array() ) {   
  if (current_user_can('administrator')  
       || current_user_can('editor')  
       || current_user_can('author')  
       || current_user_can('bbp_moderator')  
       || current_user_can('bbp_keymaster')  
       || current_user_can('employer')) {  
      $args['tinymce'] = true;  
   return $args;  
  }   
  else {  
   $args['tinymce'] = true;  
   $args['quicktags'] = false;  
   return $args;  
  }   
 }  
 add_filter( 'bbp_after_get_the_content_parse_args', 'bbp_enable_visual_editor' );  

Monday, September 25, 2017

Disable WP Dashboard for Subscriber but Enable for Editor, Author and Other Custom Roles

Using the code below you can disable access to your WordPress Dashboard/Backend for selected roles and users belonging to that particular role. For example, if you want to restrict dashboard access to your guest users and users belonging to 'Subscriber' role then you may add the following code in your theme's function.php file or best way is to use the Code Snippet plugin.
 There are many added benefits, which you can read in the plugin's description page, when you use Code Snippet instead of directly inserting your code into your theme's function.php file.

 // Source: https://premium.wpmudev.org/blog/limit-access-to-your-wordpress-dashboard/  
 add_action( 'init', 'blockusers_init' );  
 function blockusers_init() {  
  if ( is_admin() && !current_user_can( 'administrator' )   
       && !current_user_can('editor')  
       && !current_user_can('author')  
       && !current_user_can('translator')  
       && !( defined( 'DOING_AJAX' ) && DOING_AJAX ) ) {  
      wp_redirect( home_url() );  
      exit;  
  }  
 }  

Note that I have also added a custom role called 'translator' in the above code.

Below is a screenshot of how I have added the code to my site by making use of the Code Snippet plugin.

Disable WP Dashboard for Subscriber but Enable for Editor, Author and Other Custom Roles
Click image to enlarge


Sunday, September 17, 2017

Import SQL File from Command Line (CLI)

Here's a simple way to import your SQL file/dump using your Command Line Interface (CLI) or what is also known as Terminal:
 mysql> USE database_name;  
 mysql> source filename.sql;  
You can use this method to import database, also if your database size is very large and your are facing problems importing it from phpMyAdmin.

Saturday, September 16, 2017

Reset AUTO_INCREMENT Value in MySQL

You can reset the AUTO_INCREMENT value in MySQL either by using a SQL command or by using phpMyAdmin.

NOTE: You cannot reset the counter to a value less than or equal to the value that is currently in use. For both InnoDB and MyISAM, if the value is less than or equal to the maximum value currently in the AUTO_INCREMENT column, the value is reset to the current maximum AUTO_INCREMENT column value plus one.

To reset the Primary Key Value to 1, you should either delete the table and create a new table or TRUNCATE the table and apply the command below. But DON'T do this, if you already have data in your table.

1. Using SQL Command:
 ALTER TABLE table_name AUTO_INCREMENT =1;  

where,
- table_name is the name of the table whose AUTO_INCREMENT value you want to reset.

2. Using phpMyAdmin Operation:
 - First open the table whose AUTO_INCREMENT value you would like to reset.
 - Once inside the table click on the Operation tabs as shown in the image below.

Click on image to enlarge

3. To save the changes you've made, click on Go.

Friday, September 15, 2017

Add Country Selection List to your BuddyPress Profile & Registration Page


Add Country List in BuddyPress Profile & Registration Page

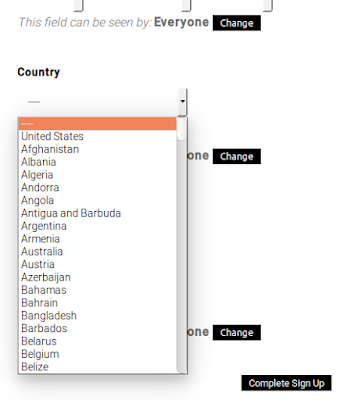
In this tutorial I will show you how you can easily add a Country list, as shown in the image above to your BuddyPress User Extended Profiles or Wordpress Registration Page using BuddyPress.

1. First head over to Github & download the following code: http://bit.ly/2f0xk7X.

As you must have noticed in the comments, in the Github page of the above code; you may have to add the following line of code just before the foreach loop at line number 222; which is basically, you are initializing the value of $i to 1. 

 $i = 1;  //

Copy the above code and add it to your 'bp-custom.php' file. If this file already exists in your site then it should be located at 'wp-contents/plugins/bp-custom.php'; else you have to create it and place it at the aforementioned location. You can read more about 'bp-custom.php' file here: http://bit.ly/2y3IQak. There you will be able to understand why it's best to add the above code in your 'bp-custom.php' file and not in your theme's 'function.php' file.

Now, open the following link to access the Country List. Suppose, your site name is www.example.com, then you will have to enter: http://www.example.com/wp-admin/users.php?page=bp-profile-setup. You should now be able to view a Country List field as shown in the image below:

NOTE:
 - Once you are able to view the Country List in your Profile Fields page you may remove the above code from your 'bp-custom.php' file, else your 'bp_xprofile_fields' table, which is the table that stores the above country list might go on getting unnecessarily populated with the all the above 193 country names.
- Only edit your field after removing the above code from your bp-custom.php file for aforementioned reasons.
- If you would like to have the Delete option for this field in your Profile Fields Admin Page, then  change line 14 as below:
 'can_delete'   => true,  

- Likewise you can also alter the value of the 'name' and 'description' fields in the code itself.

Saturday, September 9, 2017

[SOLVED] - Hash Sum mismatch, Ubuntu 14.04

If you have been repeatedly getting the following errors when trying to update Ubuntu, and have perhaps the simple solution I tried my help you.

>> Error:
 W: Failed to fetch http://np.archive.ubuntu.com/ubuntu/dists/trusty-updates/universe/binary-amd64/Packages Hash Sum mismatch  
 W: Failed to fetch http://np.archive.ubuntu.com/ubuntu/dists/trusty-updates/main/binary-amd64/Packages Hash Sum mismatch  
 W: Failed to fetch http://np.archive.ubuntu.com/ubuntu/dists/trusty-updates/universe/binary-i386/Packages Hash Sum mismatch  
 E: Some index files failed to download. They have been ignored, or old ones used instead.  

All the solution mentioned here didn't work for me:
>> Solution: Finally this simple solution worked for me:

[SOLVED] - Hash Sum mismatch, Ubuntu 14.04

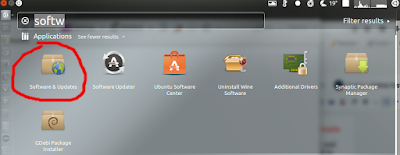
1. Open your Unity Dash and type 'Software & Updates' and select it.

[SOLVED] - Hash Sum mismatch, Ubuntu 14.04


2.  Try with various mirrors available from the 'Download from' list. You can start with Main Server and if that doesn't work out other mirrors.

This approach worked for me, try it, might work for you as well.

Install Latest Version of Vivaldi Browser in Ubuntu using your Terminal

If you are looking to install the latest version of Vivaldi in your Ubuntu installation, execute the commands below:

Step 1. First copy the Vivaldi .deb package download link from Vivaldi's page at: http://bit.ly/2eMj7eH & RIGHT CLICK, COPY the link location as shown in the image below:


Step 2. Now open your Terminal (CTRL+ALT+T) and enter the following commands:

 wget https://downloads.vivaldi.com/stable/vivaldi-stable_1.11.917.43-1_amd64.deb  

Replace the above link with the link you copied in Step 1.

 sudo dpkg -i vivaldi-stable_1.11.917.43-1_amd64.deb  

You can start Vivaldi from your browser by entering:

 $ vivaldi  

If in any caseyou would like to REMOVE Vialdi, please enter the commands below:

 sudo apt-get remove vivaldi*  

Wednesday, August 30, 2017

[SOLVED] - Restart Nautilus From Your Terminal

To restart nautilus from your Terminal enter the following commands:

 nautilus -q && nautilus &  

Now Press:

 CTRL C  

Monday, August 21, 2017

Download YouTube Video Without Using Any Software - The Easiest Way!


Download the Video Download Firefox Addon from here: https://mzl.la/2chQiWu

Saturday, August 19, 2017

View all the User Role's Name & Slug of your Wordpress Site

Use the code below to view the Name & Slug of all the User Roles of your Wordpress site. You may insert the code in the header.php or footer.php of your Theme file. After your are done using it, please do not forget to remove the code from your site.

 <?php  
 $wp_roles = new WP_Roles();  
 $names = $wp_roles->get_names();  
 print_r($names);  
 ?>  

Friday, August 11, 2017

Enable LastPass Password Manager in your Brave Browser

Please watch this screencast I made showing how to enable LastPass in your Brave Browser:


Thursday, August 10, 2017

How To Install Canon EOS Utility Without Original CD

Awesome fix for Installing Canon EOS Utility without Original CD

Just make sure you follow everything in the video exactly and the utility should install. Make sure you enter the key name under Canon ditto as 'Canon Utility'


[SOLVED] - Exited with non-zero exit status 32: mount: unknown filesystem type 'exfat' in Ubuntu 14.04

If you are trying to mount an exFat file system & getting the following error:

Exited with non-zero exit status 32: mount: unknown filesystem type 'exfat'.

Follow the steps below to resolve the issue:

You get this error because the exfat filesystem is not installed in Ubuntu by default. exFAT is a proprietary and patented by Microsoft.

Ubuntu 14.04 or higher

Since Ubuntu 13.10, this package is in the main repository. Just install exfat-fuse and exfat-utils:

 sudo apt-get install exfat-fuse exfat-utils  

Ubuntu 12.04

For ubuntu 13.04 and lower, you'll need a ppa to install the exfat support. Installation procedure:

 sudo apt-get install exfat-fuse exfat-utils  

If you see the error gpg: "tag:launchpad.net:2008:redacted" not a key ID: skipping during the apt-add-repository step, then you'll need to manually install the signing key and run the apt-get update and apt-get install steps after that:

 sudo apt-key adv --keyserver keyserver.ubuntu.com --recv-keys 4DF9B28CA252A784  

Source: https://askubuntu.com/questions/364270/mount-unknown-filesystem-exfat

Sunday, August 6, 2017

[SOLVED] - Rearrange/Reorder Forum, Forum Topic Display in Wordpress

Please follow the instructions below to reorder/rearrange your forum, category, tags etc in Wordpress:

1. First you will have to install the following plugin: http://bit.ly/2hzJQj8.

2. Now goto >> Settings >> & Select Intuitive CPO. See image below.

[SOLVED] - Rearrange/Reorder Forum, Forum Topic Display in Wordpress

3. Select the Post Types & Taxonomies you would like to reorder as shown in the image below.

Rearrange/Reorder Forum, Forum Topic Display in Wordpress
Click image to enlarge
4. Now go to Forums and just drag and drop your Forums & Forum Topics as per your requirement.

Sunday, June 4, 2017

Updating Magento 2.1.x to a Newer Version

To update Magento 2.1.x to a newer version, say your current Magento installation is version 2.1.2 Community Edition, and you would like to update your Magento to the latest version 2.1.3 Community Edition, then use the following commands. Firstly open up your terminals and execute command as below:

Note: Don't use sudo while using composer for the reasons best explained here: http://bit.ly/2rDTRPk

 composer require magento/product-community-edition 2.1.3 --no-update  
 composer update  
 rm -rf var/di/* var/generation/*  
 php bin/magento cache:clean  
 php bin/magento cache:flush  
 php bin/magento setup:upgrade  
 php bin/magento setup:di:compile  
 php bin/magento indexer:reindex  

Same method can be applied for Updating Magento from:
  • Magento 2.1.3 to Magento 2.1.4
  • Magento 2.1.4 to Magento 2.1.5 and so on...

Friday, June 2, 2017

[SOLVED] - Unable to Delete Messages in Thunderbird Email Client

If you cannot delete messages in Thunderbird, it may be caused by a corrupted trash folder.

Here is how to delete the corrupted trash folder and create a new one:
  1. First, open your Profile folder:
     
    • At the top right of the Thunderbird window, click the menu button 
      New Fx Menu , then select Help, and then Troubleshooting Information. The Troubleshooting Information tab will open.
    • Under the Application Basics section, click on Open Directory. A window with your profile files will open.
  2. Close Thunderbird.
     
  3. Open the Mail (or ImapMail) folder in your file manager (according to whether you are using POP or IMAP with the affected account).
     
  4. Open the folder with your incoming mail server name (something like imap.googlemail.com or pop.googlemail.com).
     
  5. Select the Trash and Trash.msf files and delete them. In some accounts, these may be named Bin or Deleted.
     
  6. Restart Thunderbird.
     
    • If you are using IMAP, a new Trash folder will be automatically created by Thunderbird.
    • If you are using POP:
       
      1. In the folder list, right-click on your account name and select New Folder....
         
      2. Enter Trash as folder's name and confirm by clicking on Create Folder.
The trash will reappear and you will be able to delete mail again.

Source: https://support.mozilla.org/en-US/kb/cannot-delete-messages

Saturday, May 27, 2017

[SOLVED] - VirtualBox Not Updating Due To Error "Breaks existing package..."

The 'Breaks existing package' error usually happens when you are trying to update VirtualBox from say version 5.0.x to 5.1.x. To resolve this issue you will first have to uninstall VirtualBox. Open your terminal and enter the commands below:

 sudo apt-get purge virtualbox-*  

Now install VirtualBox using the code below. But first find the version number of the latest VirtualBox package available by visiting the following page: https://www.virtualbox.org/wiki/Downloads. When I checked the latest VirtualBox version available was: VirtualBox 5.1.22.

 sudo apt-get update  
 sudo apt-get install virtualbox-5.1.22   

After upgrading VirtualBox you will also have to update your Extension Pack. You can download the Extension Pack from the aforementioned page.

[SOLVED] - VirtualBox Not Updating Due To Error "Breaks existing package..."

Thursday, May 18, 2017

[SOLVED] - Disable Merged CSS & JavaScript using phpMyAdmin in your Magento Installation

If your Magento site is malfunction because of enabling CSS & JavaScript merging and minification, then you can apply the solution explained in the following page: https://magento.stackexchange.com/questions/80765/how-do-i-disable-merged-css-and-js

Monday, May 15, 2017

[SOLVED] - Unable to find expected entry 'universe/source/Sources' in Release file (Wrong sources.list entry or malformed file)

Because of repeatedly getting the following error,
 W: Failed to fetch http://archive.ubuntu.com/ubuntu/dists/trusty/Release  Unable to find expected entry 'universe/source/Sources' in Release file (Wrong sources.list entry or malformed file); I was unable to update my source list and thus unable to install softwares from the terminal. Finally, today I managed to solved this issue and also was able to update my apt source list.

1. Open your Unity Dash & type update & select 'Softwares & Updates' as shown in the image below:

Solve - Wrong sources.list entry or malformed file issue
Click image to enlarge
2. Click 'Download from' and choose 'Other'


3. Click 'Select Best Server'. Ubuntu will take some time to select the best server for you. Accept it.

4. Now try running the software update again. It should work.

5. If it does not go through steps 1-4 again. This time Ubuntu will (hopefully) select a different server as the 'Best server'. Try software update again.
THE KEY IS TO CHANGE THE DOWNLOAD SERVER FROM WHERE UBUNTU UPDATES ITSELF.

- With inputs from: https://askubuntu.com/questions/383644/how-to-solve-wrong-sources-list-entry-or-malformed-file/795941

Thursday, May 11, 2017

[SOLVED] - Web Setup Wizard/Component Manager Not Working - Magento 2

The first thing you need to do when you are unable to access your Component Manager page in your Magento 2x installation is to press F12, Click on Console & view the error message displayed there. Please look at the image below:

[SOLVED] - Web Setup Wizard/Component Manager Not Working - Magento 2
Click on image to enlarge
The message displayed in red are the error messages(s). With this error message in hand you will begin to get some idea about the direction you need to take to troubleshoot.

[SOLVED] - Web Setup Wizard/Component Manager Not Working - Magento 2
Click on image to enlarge
In my case, I copied the link that was causing the Error & tried to view it in the browser. When I did that I got new error messages generated as below:

Click on image to enlarge
This was the error I was getting precisely:

[RuntimeException]                                                                                                                                                                                                      
  Failed to execute git clone --mirror 'git@github.com:rusdragos/m2-weltpixel-backend.git' '/var/www/html/var/composer_home/cache/vcs/git-github.com-rusdragos-m2-weltpixel-backend.git/'  
                                                                                                                                                        

I checked the 'composer.json' file in the Magento root directory and found the above git command and simply removed it. & voila!, my problem got solved.

Wednesday, May 10, 2017

Carriage returns in PHP

Carriage return is "\r". Mind the double quotes!

If you want to put a line break in your text, while using PHP, and want to render it correctly in different operating system:
  • Mac: \r
  • Linux/Unix: \n
  • Windows: \r\n

Friday, May 5, 2017

Eclipse Lagging While Typing PHP Codes, Java Codes etc in Windows or Linux

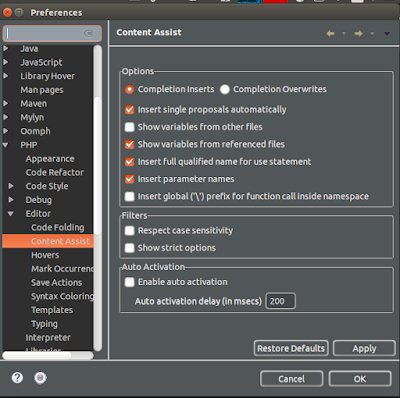
If you are experiencing lag and delays while typing your codes in the Eclipse IDE the following simple change in your settings will resolve the issue.

1. Goto Windows
2. Goto Preferences
3. Then suppose you want to resolve the issue for PHP, select PHP
4. Under PHP >> Editor
5. Under PHP >> Editor >> Content Assist
6. Deselect the option 'Enable auto activation', or
7. You may increase the 'Auto activation delay'

Please refer image below if you are still unclear with the above steps:

Eclipse Lagging While Typing PHP Codes, Java Codes etc in Windows or Linux
 

Sunday, April 23, 2017

[SOLVED] - Connecting to Amazon EC2 Instance from Terminal in Ubuntu using SSH

This tutorial shows you how to connect to your Amazon EC2 Instance from your Ubunut's terminal/CLI by making use of SSH.

NOTE: if you have not installed a tool like OpenSSH in your Ubuntu system you may do so by checking out the following tutorial: http://linux-sys-adm.com/how-to-install-and-configure-ssh-on-ubuntu-server-14.04-lts-step-by-step/ or use a tool like PuTTY.

1. First down the EC2 Key Pair Private Key for your EC2 instance. To generate Key Pair, you may check the following tutorial: http://docs.aws.amazon.com/AWSEC2/latest/UserGuide/ec2-key-pairs.html

2. Copy the Key pair (.pem) key to the location of your choice and make note of the location path. In my case, I created a folder called 'aws-keys' under my 'home' directory and placed the '.pem' file there.

3. Open your terminal & change the file/folder permission to 600 where you have stored your '.pem' key, else you will get an error as shown in the image below:

Click image to enlarge
NOTE: since you have changed 'file permission' to 600, you will have to use sudo.

 $ sudo chmod -R 600 aws-keys  

 4. Now enter the following commands to connect to your AWS EC2 Instance:

 sudo ssh -i file_name.pem ec2-user@<publicDNS>  

You can find your publicDNS in your EC2 Dashboard. Please refer image below:

Click image to enlarge
If login is successful you will see a message similar to the one show in the image below, depending upon your Amazon Machine Image (AMI).

Click image to enlarge

Uninstalling LibreOffice from Ubuntu using Terminal/Command Line

Please follow the instruction below to Uninstall LibreOffice from your Ubuntu system:

 sudo apt-get remove --purge libreoffice*  
 sudo apt-get clean  
 sudo apt-get autoremove  

Installing LibreOffice in Ubuntu from .deb Packages using Terminal

This tutorial will show you how to install the latest version of LibreOffice in your Ubuntu system. If you haven't downloaded the latest build for LibreOffice, go ahead do it at: https://www.libreoffice.org/download/download/.

1. When you unpack the downloaded archive, you will see that the contents have been decompressed into a sub-directory.

2. Now,change directory to the one starting with "LibreOffice_", followed by the version number and some platform information. Example:

 $ cd LibreOffice_5.3.2.2_Linux_x86-64_deb  

4. This directory contains a subdirectory called "DEBS". Change directory to the "DEBS" directory.

 $ cd DEBS  

5. Now open your terminal (CTRL+ALT+T) and enter as below.The following commands will install LibreOffice and the desktop integration packages (you may just copy and paste them into the terminal screen rather than trying to type them):

 $ sudo dpkg -i *.deb  

The installation process is now completed, and you should have icons for all the LibreOffice applications in your desktop's Applications/Office menu. You may also open your Unity Dash & start LibreOffice from there.

To uninstall LibreOffice,

Please check my other tutorial at: http://www.evagabond.me/2017/04/uninstalling-libreoffice-from-ubuntu.html

Friday, April 7, 2017

Lesson 1- Introduction to Amazon Elastic Compute Cloud (EC2)

This video gives you a clear understanding of the basics of Amazon EC2 web services.

Sunday, March 26, 2017

[SOLVED] - Add Currently Logged in User to Apache User & Group [www-data:www-data]

If you are experiencing permission issues with your web directories and files, use the following commands to resolve it, This solution is very helpful if you are trying to run Wordpress/Other CMS in localhost environment:

1. Adds the currently logged in user to the www-data group.

 sudo usermod -aG www-data $USER  

2. Changes the ownership of the /var/www directory to www-data group.
 sudo chown -R www-data:www-data /var/www directory_name

3. Sets the proper permissions so you can upload files via sftp, manage files via command-line, and upload plugins and media directly in WordPress.
 sudo chmod -R 774 /var/www directory_name

Saturday, March 11, 2017

How to Zip/Compress files using Terminal in Ubuntu/Linux

Use the following commands to compress your files using terminal. First, make sure you have Zip already installed in your system.

>> To install Zip: Open you terminal (CTRL+ALT+T) and enter the command below:
 sudo apt-get install zip gzip tar  

>> To Zip:
 zip -r compressed_filename.zip foldername  

where:
  • r: recursive
  • compressed_filename.zip: name of your .zip folder you want to create. Example: magento-file-sys.zip
  • folder_name: name of the folder that you want to compress
Seems to be much faster and consume almost 80%-90% less CPU processes than the one using GUI/Archive Manager.; but file size seems to be large by 10-20 MB than the one created using the menu option available in GUI/Archive Manager.

>> To Unzip:
 unzip my_arch.zip  

Zip stores relative path names by default. There are several parameter-options available for zip. For that read: the manual (man zip). For a starting this will do.

Most often you will see .tar.gz endings in linux-world. That's the product of two tools: TAR (the tape archiver) and GZIP (the GNU-Zip). Tar has got the call option to automatically gzip/gunzip files after "taring".
 tar -cvzf may_arch.tar.gz my_folder  

where:
  • -c means "create"
  • -v means "verbose" (sometimes bothersome and slowing down...)
  • -z means "use (GNU)zip"
  • -f XYZ declares the name of the output file. (You should chose a helping name like XYZ.tar.gz)
There may also be .tar.bz2 endings. This is the product of the -j parameter instead of the -z parameter: you will choose compression with BZIP2 (-> man bzip2).

To extract you simply use -x (eXtract) instead of -c (Create):
 tar -xvzf may_arch.tar.gz  

Wednesday, March 8, 2017

[SOLVED] - W: GPG error: .. The following signatures were invalid: BADSIG ... Ubuntu Extras Archive Automatic Signing Key

While trying to UPDATE/UPGRADE your Ubuntu system from the terminal, you might be bumping, time and again into what is called the BAD SIGNATURE error. Something like this:

W: GPG error: http://01.archive.ubuntu.com trusty Release: The following signatures were invalid: BADSIG 16126D3A3E5C1192 Ubuntu Extras Archive Automatic Signing Key <ftpmaster@ubuntu.com>

To solve the bad signature error in your Ubuntu Installation try the following solution:
 sudo apt-key adv --keyserver keyserver.ubuntu.com --recv-keys your_key_number  
 Example: sudo apt-key adv --keyserver keyserver.ubuntu.com --recv-keys 16126D3A3E5C1192  
Rebuild your software cache:
 sudo apt-get clean   
 cd /var/lib/apt   
 sudo mv lists oldlist   
 sudo mkdir -p lists/partial   
 sudo apt-get clean   
 sudo apt-get update  
If the above solution doesn't work, you may try the solution below:
 $ sudo -i  
 # apt-get clean  
 # cd /var/lib/apt  
 # mv lists lists.old  
 # mkdir -p lists/partial  
 # apt-get clean  
 # apt-get update  

Sunday, February 26, 2017

Enabling Multi-byte UTF-8 support in Drupal 7

This tutorial explains the various steps to enable Multi-byte UTF-8 support in Drupal 7. It's a very simple and straightforward process and if implemented rightly, you can easily convert your 'character set' & collation to

According to this post in drupal.org, multi-byte UTF-8 support for MySQL and other database drivers, allows emojis, Asian symbols, mathematical symbols, etc with your Drupal 7 installation. The only caveat to this is that your Drupal installation must be at least Version 7.50 or higher.


Requirements:
  •  Drupal: Version 7.50 or above
 Initially when you check your Drupal Site Report at: admin/reports/status, you will see a message similar to the image below:

Click on image to enlarge

 The steps below have been compiled from the following post at drupal.org: https://www.drupal.org/node/2754539

For MySQL

1. In order to be able to use this, the following requirements must be met:

In order to allow for large indexes, MySQL must be set up with the following my.cnf settings:

 [mysqld]  
 innodb_large_prefix=true  
 innodb_file_format=barracuda  
 innodb_file_per_table=true  

These settings are available as of MySQL 5.5.14, and are defaults in MySQL 5.7.7 and up.

After editing the my.cnf file (often located at /etc/mysql/my.cnf), don't forget to restart the mysql service (for example, with the command sudo service mysql restart) in order to load the new configuration.

2. The PHP MySQL driver must support the utf8mb4 charset (libmysqlclient 5.5.3 and up, as well as mysqlnd 5.0.9 and up).

3. The MySQL server must support the utf8mb4 charset (5.5.3 and up).

Run the command mysql --version to see your current MySQL version.

Steps to enable 


For existing Drupal installations
  • First, back up your database and convert all existing tables to utf8mb4, such as by using the drush command provided by the utf8mb4_convert contrib project.
     
  • Set the "charset" and "collation" keys on the database connection array in settings.php to "utf8mb4" and "utf8mb4_general_ci" respectively:

     $databases['default']['default'] = array(  
      'driver' => 'mysql',  
      'database' => 'databasename',  
      'username' => 'username',  
      'password' => 'password',  
      'host' => 'localhost',  
      'charset' => 'utf8mb4',  
      'collation' => 'utf8mb4_general_ci',  
     );  
    

 For new Drupal installations

  • Prior to running the installer, edit settings.php and manually add in the full database settings array code, with 'charset' as 'utf8mb4', and 'collation' as 'utf8mb4_general_ci', and with the actual values for 'database', 'username', 'password', 'host', as shown below:

     databases['default']['default'] = array(  
      'driver' => 'mysql',  
      'database' => 'databasename',  
      'username' => 'username',  
      'password' => 'password',  
      'host' => 'localhost',  
      'charset' => 'utf8mb4',  
      'collation' => 'utf8mb4_general_ci',  
     );  
    

  • Then run the installer specifically by accessing install.php, as in http://example.com/install.php (not just http://example.com/)

Other database systems


  • PostgreSQL and SQLite support 4-byte UTF-8 out-of-the-box, so no special changes are needed for these.
  • MariaDB and other MySQL equivalents should likely work with similar instructions as above for MySQL.
  • Database drivers provided by contributed modules may or may not support this feature. The best place to look for answers is the issue queue of the contributed module which provides the database driver you are using.
Now when you look at your Drupal Site Report, you should be getting a warning message as the image below, which is related to Database 4 byte UTF-8 support:

Click on image to enlarge 

Converting Characterset & Collation to utf8mb4:

Using SQL commands:

 ALTER DATABASE db_name CHARACTER SET utf8mb4 COLLATE utf8mb4_general_ci;  
 ALTER TABLE tablename CONVERT TO CHARACTER SET utf8mb4 COLLATE utf8mb4_unicode_ci;  

Or if you're still on MySQL 5.5.2 or older which didn't support 4-byte UTF-8, use utf8 instead of utf8mb4:

 ALTER DATABASE databasename CHARACTER SET utf8 COLLATE utf8_unicode_ci;  
 ALTER TABLE tablename CONVERT TO CHARACTER SET utf8 COLLATE utf8_unicode_ci;  


Easier way using Drush:


Now to convert all your database tables to utf8mb4 characterset and utf8mb4_general_ci collation, you may make use of the following Drush command called UTF8MB4 Convert. Please find detailed instructions of this command here: https://www.drupal.org/project/utf8mb4_convert.

The conversion process in your terminal after executing the above commands should be as below:

Click image to enlarge
 Final Message After Conversion:


Click image to enlarge
Finally when all your tables are converted, you can view each of their's Collation by using any database management tool such as phpMyAdmin. 

 
Click image to enlarge

Finally your Drupal site should display a message like this, confirming successful enabling of  Multi-byte UTF-8 support.

Click image to enlarge
 That's all there is to enable multi-byte UTF-8 support in Drupal 7.

Top 5 Posts (Weekly)