Search blog

Thursday, September 28, 2017

Enable both Visual & HTML Editor for Admin, Editor & Author but Only Visual Editor for Subscriber in bbPress

Use the code below to enable both Visual & HTML Editor for roles such as Admin, Editor & Author but Only Visual Editor for Subscriber in your bbPress installation:

 function bbp_enable_visual_editor( $args = array() ) {   
  if (current_user_can('administrator')  
       || current_user_can('editor')  
       || current_user_can('author')  
       || current_user_can('bbp_moderator')  
       || current_user_can('bbp_keymaster')  
       || current_user_can('employer')) {  
      $args['tinymce'] = true;  
   return $args;  
  }   
  else {  
   $args['tinymce'] = true;  
   $args['quicktags'] = false;  
   return $args;  
  }   
 }  
 add_filter( 'bbp_after_get_the_content_parse_args', 'bbp_enable_visual_editor' );  
Monday, September 25, 2017

Disable WP Dashboard for Subscriber but Enable for Editor, Author and Other Custom Roles

Using the code below you can disable access to your WordPress Dashboard/Backend for selected roles and users belonging to that particular role. For example, if you want to restrict dashboard access to your guest users and users belonging to 'Subscriber' role then you may add the following code in your theme's function.php file or best way is to use the Code Snippet plugin.
 There are many added benefits, which you can read in the plugin's description page, when you use Code Snippet instead of directly inserting your code into your theme's function.php file.

 // Source: https://premium.wpmudev.org/blog/limit-access-to-your-wordpress-dashboard/  
 add_action( 'init', 'blockusers_init' );  
 function blockusers_init() {  
  if ( is_admin() && !current_user_can( 'administrator' )   
       && !current_user_can('editor')  
       && !current_user_can('author')  
       && !current_user_can('translator')  
       && !( defined( 'DOING_AJAX' ) && DOING_AJAX ) ) {  
      wp_redirect( home_url() );  
      exit;  
  }  
 }  

Note that I have also added a custom role called 'translator' in the above code.

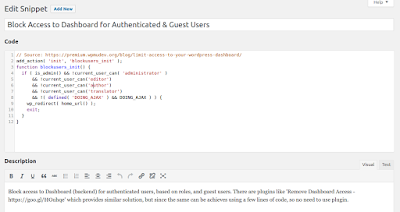
Below is a screenshot of how I have added the code to my site by making use of the Code Snippet plugin.

Disable WP Dashboard for Subscriber but Enable for Editor, Author and Other Custom Roles
Click image to enlarge


Sunday, September 17, 2017

Import SQL File from Command Line (CLI)

Here's a simple way to import your SQL file/dump using your Command Line Interface (CLI) or what is also known as Terminal:
 mysql> USE database_name;  
 mysql> source filename.sql;  
You can use this method to import database, also if your database size is very large and your are facing problems importing it from phpMyAdmin.

Saturday, September 16, 2017

Reset AUTO_INCREMENT Value in MySQL

You can reset the AUTO_INCREMENT value in MySQL either by using a SQL command or by using phpMyAdmin.

NOTE: You cannot reset the counter to a value less than or equal to the value that is currently in use. For both InnoDB and MyISAM, if the value is less than or equal to the maximum value currently in the AUTO_INCREMENT column, the value is reset to the current maximum AUTO_INCREMENT column value plus one.

To reset the Primary Key Value to 1, you should either delete the table and create a new table or TRUNCATE the table and apply the command below. But DON'T do this, if you already have data in your table.

1. Using SQL Command:
 ALTER TABLE table_name AUTO_INCREMENT =1;  

where,
- table_name is the name of the table whose AUTO_INCREMENT value you want to reset.

2. Using phpMyAdmin Operation:
 - First open the table whose AUTO_INCREMENT value you would like to reset.
 - Once inside the table click on the Operation tabs as shown in the image below.

Click on image to enlarge

3. To save the changes you've made, click on Go.

Friday, September 15, 2017

Add Country Selection List to your BuddyPress Profile & Registration Page


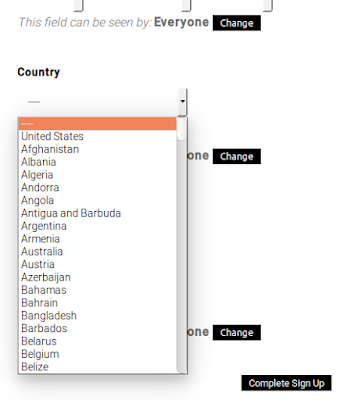
Add Country List in BuddyPress Profile & Registration Page

In this tutorial I will show you how you can easily add a Country list, as shown in the image above to your BuddyPress User Extended Profiles or Wordpress Registration Page using BuddyPress.

1. First head over to Github & download the following code: http://bit.ly/2f0xk7X.

As you must have noticed in the comments, in the Github page of the above code; you may have to add the following line of code just before the foreach loop at line number 222; which is basically, you are initializing the value of $i to 1. 

 $i = 1;  //

Copy the above code and add it to your 'bp-custom.php' file. If this file already exists in your site then it should be located at 'wp-contents/plugins/bp-custom.php'; else you have to create it and place it at the aforementioned location. You can read more about 'bp-custom.php' file here: http://bit.ly/2y3IQak. There you will be able to understand why it's best to add the above code in your 'bp-custom.php' file and not in your theme's 'function.php' file.

Now, open the following link to access the Country List. Suppose, your site name is www.example.com, then you will have to enter: http://www.example.com/wp-admin/users.php?page=bp-profile-setup. You should now be able to view a Country List field as shown in the image below:

NOTE:
 - Once you are able to view the Country List in your Profile Fields page you may remove the above code from your 'bp-custom.php' file, else your 'bp_xprofile_fields' table, which is the table that stores the above country list might go on getting unnecessarily populated with the all the above 193 country names.
- Only edit your field after removing the above code from your bp-custom.php file for aforementioned reasons.
- If you would like to have the Delete option for this field in your Profile Fields Admin Page, then  change line 14 as below:
 'can_delete'   => true,  

- Likewise you can also alter the value of the 'name' and 'description' fields in the code itself.

Saturday, September 9, 2017

[SOLVED] - Hash Sum mismatch, Ubuntu 14.04

If you have been repeatedly getting the following errors when trying to update Ubuntu, and have perhaps the simple solution I tried my help you.

>> Error:
 W: Failed to fetch http://np.archive.ubuntu.com/ubuntu/dists/trusty-updates/universe/binary-amd64/Packages Hash Sum mismatch  
 W: Failed to fetch http://np.archive.ubuntu.com/ubuntu/dists/trusty-updates/main/binary-amd64/Packages Hash Sum mismatch  
 W: Failed to fetch http://np.archive.ubuntu.com/ubuntu/dists/trusty-updates/universe/binary-i386/Packages Hash Sum mismatch  
 E: Some index files failed to download. They have been ignored, or old ones used instead.  

All the solution mentioned here didn't work for me:
>> Solution: Finally this simple solution worked for me:

[SOLVED] - Hash Sum mismatch, Ubuntu 14.04

1. Open your Unity Dash and type 'Software & Updates' and select it.

[SOLVED] - Hash Sum mismatch, Ubuntu 14.04


2.  Try with various mirrors available from the 'Download from' list. You can start with Main Server and if that doesn't work out other mirrors.

This approach worked for me, try it, might work for you as well.

Install Latest Version of Vivaldi Browser in Ubuntu using your Terminal

If you are looking to install the latest version of Vivaldi in your Ubuntu installation, execute the commands below:

Step 1. First copy the Vivaldi .deb package download link from Vivaldi's page at: http://bit.ly/2eMj7eH & RIGHT CLICK, COPY the link location as shown in the image below:


Step 2. Now open your Terminal (CTRL+ALT+T) and enter the following commands:

 wget https://downloads.vivaldi.com/stable/vivaldi-stable_1.11.917.43-1_amd64.deb  

Replace the above link with the link you copied in Step 1.

 sudo dpkg -i vivaldi-stable_1.11.917.43-1_amd64.deb  

You can start Vivaldi from your browser by entering:

 $ vivaldi  

If in any caseyou would like to REMOVE Vialdi, please enter the commands below:

 sudo apt-get remove vivaldi*  

Top 5 Posts (Weekly)